
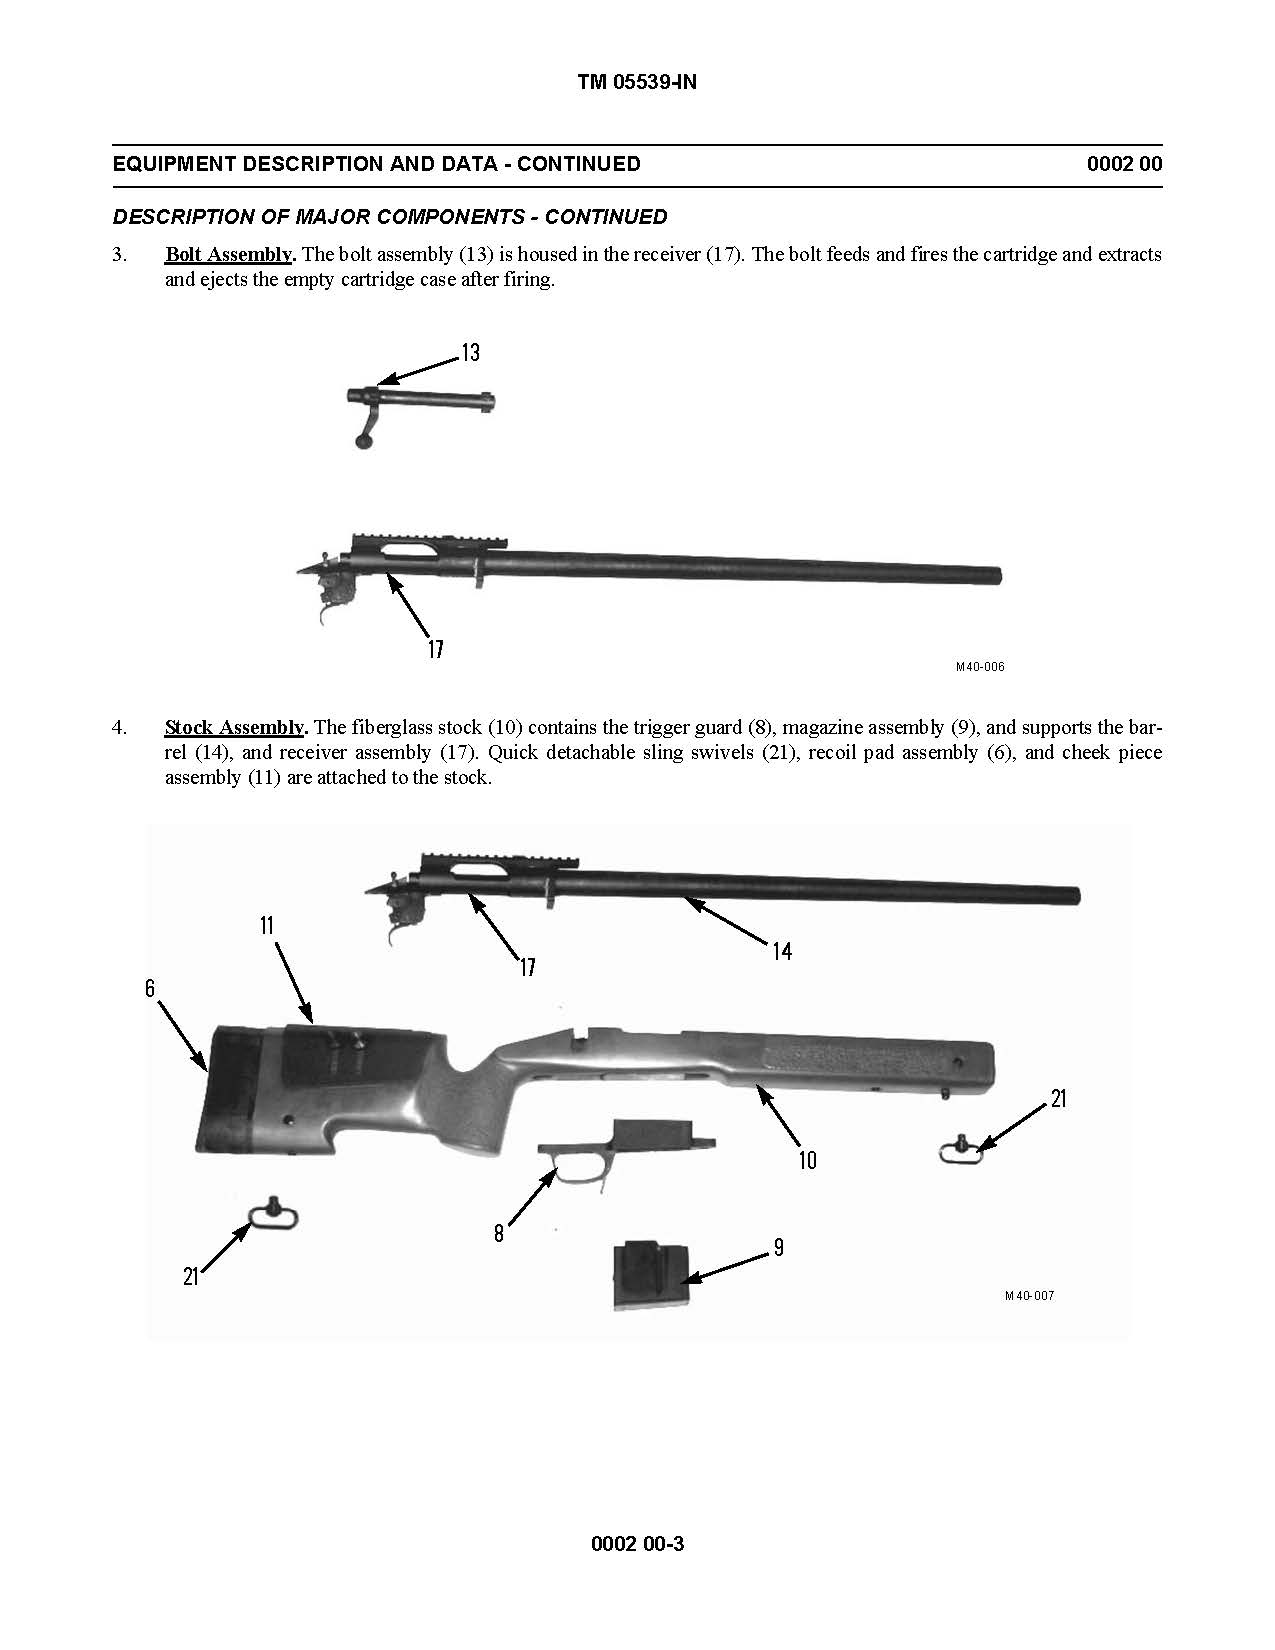
USMC Marines Manual - Sniping
Use a toothbrush to remove excessive grease, oil, and dirt. Use the soft-haired paintbrush to dust out recesses and to remove lint Lubricate accordingly. All moving parts of the rifle should be lubricated with rifle grease or something similar. When not in use, the rifle and scope should be cased, and the lenses should be capped. In field use, where tissue may not be avail- able, a soft clean cloth may be substituted. The following precautions will prevent damage: Be careful not to change coarse windage adjustment. Body grease and per- spiration injure them.
Lenses magnify and concentrate sunlight into a pinpoint of intense heat which is focused on the mil scale reticle. This may melt the mil dots and damage the telescope internally. This could damage the scope severely and permanently, plus change the zero. The rifle should be stored in a room with the temperature equal to the out- side temperature. If the rifle is taken into a warm area, con- densation will occur, thus requiring a thorough cleaning and drying before being taken into the cold. Otherwise, the con- densation will cause icing on exposed metal parts and optics.
Concen- trated heat must not be applied, because it will cause expansion and damage. Moisture may also be blotted from the optics with soft, dry cloths. Focusing parts are particularly sensitive to freezing oils. Breathing will form frost, so the optical surfaces must be cleaned with lens tissue, preferably dampened lightly with alcohol. Do not, however, apply the alcohol directly to the glass. During periods of this ex- posure, the rifle must be checked frequently and cleaned as often as possible, even if it means only lubricating the weap- on.
The weapon should always be well lubricated, including the bore, except when actually firing. Before firing, always run a dry patch through the bore, if possible. Keep rifle in case when not in use. Protect from rain and moisture whenever possible. Keep ammunition clean and dry. Clean rifle, bore, and chamber daily. Keep scope caps on scope when not in use. If moisture or fungus develops inside scope, get replacement scope. Clean and dry the stock daily. Dry the carrying case and rifle in the sun whenever possible. Then, be- fore going on a mission, slide the cloth between the barrel and stock all the way to the receiver and leave it there.
When in your firing position, slide the cloth out, thus taking all restrictive debris and sand with it Optics are especially vulnerable to hot, humid climates and salt water atmosphere. Optical equipment must NOT be exposed to direct sunlight in a hot climate. Humidity and Salt Air.
In these environments, the optical instruments must be inspected and cleaned frequently to avoid rust and corrosion. Perspiration from the hands is a contrib- uting factor to rusting. After being handled, instru- ments must be thoroughly dried and lightly oiled. PURPOSE The purpose of sniper marksmanship training is to teach the sniper the principles and techniques of precision shooting with special sniper equipment. The proper relationship between the eye, rifle sights, and target. Proper applications of all sniper positions. Firing a rifle without disturbing the sights.
Proper manipulation of sights to regulate the strike of the bullet. How weather conditions affect the sniper and the bullet and how to compensate for those conditions. Adjusting sights to hit a given target at a given range. How to bore sight a new scope.
The arrangement of an optical sight allows aiming without the use of a front and rear sight. The role of a front sight in a telescope is filled by the crosshairs. The image target and crosshairs are on the same line of sight. Both crosshairs and target have the same degree of clarity. The sniper's head must be placed at the exit pupil of the telescope. The small circle of light seen coming from the eyepiece lens when a scope is held at arms length. A 2- to 3-inch distance is average. The sniper adjusts his eye relief to ensure a full field of view.
It may be a fairly large distance, but it is necessary to ensure safety from recoil. During aiming, the sniper must ensure that there are no shadows in the field of view of the telescope. The field of view must be completely clear. If crescent-shaped shadows are present, the bullets will strike to die side away from the shadow. If the horizontal crosshair is canted, the strike of the bullet will hit in the direction of the cant.
The more the cant, the further off the target the strike of the bullet will be. The exact placement is a matter of individual preference and depends on the size of the sniper's hand and the manner in which he grips the stock. During the firing process, a gradual increase of pressure is applied straight to the rear on the trigger insuring the crosshairs continue to quarter the target.
The crosshairs cannot be held indefinitely on the point of aim; therefore, the sniper must practice to stop the finger pressure on the trigger when the crosshairs move off the point of aim. The sniper applies the remaining pressure when the crosshairs come to rest on the point of aim. The upper part of the trigger finger should be kept clear of the stock to allow a front-to-rear movement in applying pressure on the trigger.
When the finger touches the stock, there is a tendency to cause pressure at a slight angle rather than straight to the rear, this will cause the sights to be pulled off the aiming point. A firm grip on the rifle stock is essential for good trigger control. A loose grip tends to cause the hand and trigger finger to squeeze the stock and thus lose trigger control.
Trigger control is the most important steady hold factor. However, it is the most difficult fundamental to master.
The majority of errors stem directly or indirectly from the improper application of this technique. Missing the point of aim frequently results from the shooter jerking the trigger or applying pressure on both the trigger and the side of the rifle. Improper trigger control can start a chain reaction of other errors. An involuntary muscular tension in anticipation of recoil. It is indicated by: Moving shoulders forward as the rifle recoils.
An attempt to make the rifle fire at an exact time by sudden pressure on the trigger thus disturbing the alignment of the rifle with the target. The sniper does not shift his position, move bis head, or let the muzzle of the rifle drop until a few seconds after the rifle has been fired. Seeing the last sight picture as the rifle is fired, the sniper must make a determination as to where his sights were when the round broke. If he believes his shot to be at the aiming point and the shot is misplaced, the sniper could have violated one of the marksmenship principles.
If the sniper is sure none of these fundamentals were violated, then a zero change is necessary. Calling the shot assists the sniper in constantly confirming his zero. The more solid the position, the easier it is to hold the rifle and control the trigger without disturbing the sight picture. The sling is constructed in two different lengths with two leather sling keepers to secure the sling once it is on the arm.
The leather sling is preferred over the web sling because of its strength and durability. It is easier to use once the sniper is taught the basic way to attach it to the rifle and how it is placed on the arm. Another advantage of the leather sling is, once adjusted for a position, the adjustment need not be changed to tighten the sling on the rifle for carrying.
A strong foundation is just as necessary to a rifle as to a well-built house. Good shooting positions employ bone support and not muscle support. The sniper learns to relax in various shooting positions. Undue strain or tension causes trembling and is transmitted to the rifle. Through practice and natural point of aim, the sniper will be able to achieve muscular relaxation. Natural Point of Aim. In a shooting position, once the target is spotted, the sniper closes his eyes, takes a deep breath, exhales, and concentrates on making his body completely relaxed.
The rifle will fall to its natural point of aim. He opens his eyes and adjusts the position by slightly shifting his body until the rifle points to the target exactly where the bullet is to strike. These positions are flexible to allow modifications according to the individual body structure.
On the battlefield, a sniper must assume the steadiest position possible which will allow observation of the target area and provide cover and concealment. Depending on the terrain, vegetation, and tactical situation, there are innumerable possibilities; however, in most instances they will be variations of the five basic positions. Some snipers will have more difficulty in assuming a particular position than others. The sniper must apply the fundamentals of relaxation and maximum support for his rifle.
He should be permitted to adjust the position to best fit his own body structure. The wrist is straight and locked so that the rifle rests across the heel of the hand. The hand itself is relaxed. The fingers can be curled against but should not grip the stock, since the rifle should rest on the forward hand. The forward elbow should be directly under the receiver of the rifle, or as close to this position as the body will permit, with the forward elbow directly under the rifle. The bones rather than the muscles support the rifle's weight.
The sniper, by trial and error, must find the forward hand and elbow position best suited to him to avoid tension and trembling. The proper placement of the butt helps steady the rifle and prevents it from slipping out of the shoulder. With the rifle butt firmly in the shoulder, the recoil is lessened. A firm rearward pressure is exerted by the gripping hand to keep the rifle butt in its proper position in the pocket of the shoulder to reduce effects of recoil. The thumb lays on the small of the stock in its natural position, and also forms a rest for the chin.
In this way it creates a spot weld. The trigger finger is placed on the trigger in a natural position to enable the shooter to manipulate his trigger independently of the rest of his hand. This permits the trigger to be squeezed directly to the rear without disturbing the point of aim. Correctly positioned, the elbow helps form the shoulder pocket. The exact location of the elbow varies with each position and will be described in the explanation of each position. The firm contact between the head, hand, and rifle enables the head and weapon to recoil as one unit, facilitating rapid recovery between rounds.
The spot weld also enables the eye to be positioned the same distance behind the eyepiece eye relief of the scope each time the rifle is aimed and fired. This guarantees the same field of view with each sight picture, further assisting in accurate aiming. If the sniper is unable to obtain a spot weld, he should use the stock weld. To avoid this movement, the sniper holds his breath for a few seconds and, during this time, he should fire his round.
He takes a normal breath, releases part of it, and holds the remainder. He should not hold his breath for over 10 seconds, because his vision may blur and lung strain may cause muscular tension. The support or rest almost guarantees no movement of the rifle. The rest prevents muscular tension and pulse beat which is trans- mitted to the rifle, and throws the shot off target. The longer the range the steadier the rifle must be. Use of the supported positions allows a much lower silhouette and therefore offers more cover and concealment. There are four types of positions using the supported rest— prone, sitting, kneeling, and the Hawkins.
These positions may be modified to fit the sniper's location, depending on the terrain, vegetation, and situation on the battlefield. When using a supported rest, the rest itself can be any material available, such as sandbags, logs, fencing, and even the partner's back. The prone position is the most common position used.
The sniper rests his rifle on a solid object somewhere near the front sling swivel, making sure the rifle barrel is NOT resting on the support. The nonshooting arm grasps the sling on the rear sling swivel, in this way the sniper can adjust the weapon on the target. With a firm hold on the rifle, the sniper places the stock into the pocket of the shoulder and applies rearward pressure into the pocket. The shooting hand is placed in the normal manner on the small of the stock; the sniper then makes his mental checklist.
Does the sniper have full field of view in scope? Is trigger finger applying pressure straight to the rear? This position is one in which the sniper can modify for use behind any cover which provides a platform on which his rifle can be rested.
The rifle is supported on a rest, making sure rest is not touching the barrel. The nonshooting hand may be placed on the leg to ensure a solid position. The position is the same as the prone, except the support is provided by the nonshooting hand. The wrist and elbow are locked straight.
This takes up most of the recoil. The rear, or toe of the stock is placed under the armpit and rests on the ground if possible. It will appear that the sniper is lying on the rifle. When the rifle is raised to shoot, the eye is looking at the target. As the sniper looks at his target, the front sight comes into view, and at that same moment the shot is fired without actually looking for a sight picture. The team should be close to each other so both members can look on a single range card or map.
The observer should also be in a position to watch the vapor trail of the bullet down range. This will help the observer spot the splash of the impact of the round to give the sniper a correction for his next shot, if it is needed. A bullet does not follow a straight line, but travels on an arc which is called the bullet's trajectory. The sniper first must insure that: With the bolt removed from the rifle, the rifle is placed on a solid support such as a sandbag or an ammo can.
Looking through the barrel at the chamber end , the sniper adjusts the rifle until the desired aiming point is visible through the center of the bore. Without disturbing the lay of the rifle, he looks through the telescope and observes the position of the crosshairs in relation to the aiming point.
If the crosshairs do not coincide with the aiming point, he loosens the rear mounting screws on the scope mount. He turns the screws to move the scope left or right, depending on the direction the crosshairs need to go. To move the crosshairs vertical onto the aiming point, he looks through the scope, turns the left screw against the scope mount to push the rear of the scope right.
The crosshairs will be moving to the left. Course Adjustment with Scope Base for Zeroing. Zero scope as follows: Set range knob to "3" yards. Set windage and elevation, vernier to "0". Fire a group at yards. The mount base should be milled as required to bring the elevation to within 12 minutes. Windage should be adjusted to as close to "0" as possible using the rear mount windage adjusting 8 crews course adjustment. Final zeroing may now be done using the alien screws in the center of the elevation and windage knobs.
Loosen set screws and carefully adjust large aliens until point of aim and point of impact are coincident. Zeroing with Allen Wrench Figure Elevation Control View 2. Windage Control View 2. Under average conditions, some weather effects, such as temperature and humidity, are insignificant.
- U.S. Marine Corps Scout/Sniper Training Manual.
- A Brief History of the Pseudonym: Pen Names & Personalities;
- (U//FOUO) U.S. Marine Corps M40 Sniper Rifle Maintenance Manual.
- .
Sniping sometimes is done in extremes, so all effects must be considered. Wind is usually the greatest weather problem. This is known as die value of the wind. With use of a formula, a sniper can adjust his scope to compensate for the wind and to hit center. A 9- to 3-wind has the most effect on a bullet. This is the full value wind. Due to the snipers situation, all three should be learned. He divides the constant number 4 into the number of degrees to get wind velocity in miles per hour.
The sun heats up the earth's surface causing heat waves in the same manner as a piece of metal does. These waves appear to ripple or shimmer and rise straight up from the ground on a calm day. Any movement of air, however slight, will send these waves in the direction of the air flow. This mirage is clearly seen on a bright clear day.
To see this mirage through an M49 spotting scope, the sniper will first focus on an object some- where close to his target. This causes the actual focus to be short of the target, but the mirage is seen clearly. Only after constant use can a sniper become proficient in determining how much windage adjustment to put on his rifle. After finding wind direction and velocity, the windage correction is determined by the formula: R x V divided by For lvalue winds divide the answer to the above formula by 2. This formula is accurate up to yards.
Proper recording on a daily basis while shooting is most important. If a change is indicated, it should be applied to all ranges. Holding for elevation or wind are techniques used only when snipers do not have time to change sight settings. Pinpoint accuracy is rarely achieved when holding, since a minor error HOLDS in range estimation, or lack of a precise aiming point, might cause the bullet to miss the desired point. However, a hit anywhere on the body is normally disabling, so a small error is acceptable in combat.
With the USMC scope, the only holdoff on a target would be a windage holdoff. When the sniper has determined what the wind is blowing and has adjusted his sights accordingly, he then may have to hold off right or left of the target HOLDOFF slightly, depending on the "pick up" or "let off" of wind blowing. Constant practice in wind estimating can bring about proficiency in sight adjustment or learning to "holdoff" correctly.
Moving targets are the most difficult to hit. When engaging a target which is moving straight 3 to 9 o'clock, 9 to 3 o'clock across his line of sight, the sniper must concentrate moving his sight with the target, or with practice, using the LEADS "ambush" method. This is holding the crosshairs still and waiting for the target to move into the desired point, at which time, the sniper fires and lets the target walk into the bullet.
One arm and side are visible.
- Jesus: Leben - Wirken - Schicksal (German Edition)!
- Le Martyre de Saint Sebastien: Prelude to Act 3 (Horn 5 and 6 Part)!
- ?
- Julia, Coming Home (Remington Series Book 1);
The half lead target is moving at an angle of approxi- mately 45 degrees from the sniper. Determining Angle of Movement. Full Lead and Half Lead A no lead target occurs when the entire back or the front of the target is visible. The target is moving directly toward or away from the sniper. These are straight away shots. The proper method is to select a specific area for observation, move to that area under cover of darkness, and set up in a well-concealed position.
This position should have: This is where the art of observation comes into play. Every minute object is studied and identified for possible evidence of the enemy. The following is a con- servation between a sniper and an observer: The indexing of targets prevents confusion and provides a quick reference guide.
This is a conversation with the targets indexed: A target can be spotted quickly by its relation to one of the prominent features on the card. The following are methods of indicating the position of possible targets: When two targets of the same value, that are equally dangerous, present themselves, the sniper will engage the POOR aim- ing point first. The following are indicators that lead to detection: The hasty search provides the best means for picking out movement.
A majority of the targets on the battlefield will be detected because of improper camouflage. However, many times an observation post or enemy firing position will blend almost perfectly with the natural background. Only through extremely careful, detailed searching will these positions be revealed. Shine may come from many sources, such as eye- glasses, reflective metal, optical devices, pools of water, and even the natural oils from the skin.
Shine may only last for a second, so the sniper has to be alert to observe it. A target's real worth is determined by the sniper and the nature of his mission. He may lose a rapidly moving target if he waits to identify it in detail. He must consider any enemy who threatens his position as a very high-value target. When able to make a choice, there are cer- tain factors to consider: Most enemy soldiers will uBe camouflage on themselves, their equipment, and positions.
The sniper must be able to identify objects, even if he can only see parts of them, and see them from unusual angles. Unusual color stands out against its back- ground e. While observing, anything that looks out of place or unusual should be studied in minute detail by the sniper. Curiosity will greatly increase the chances of spotting the hidden enemy. Sound can be used to detect an enemy position. The first sound heard will be the crack of the bullet flying at supersonic speed as it passes overhead.
More than one crack may be heard if the bullet passes several objects. This is always followed by a lower sounding thump. This is the discharge of the rifle. At short ranges, the sounds will be close together. As the range increases, the sounds are farther apart With practice, one can determine the distance to the firer. A 1-second lapse between crack and thump is about yards; a Vi-second lapse is yards. Once range has been determined, by watching in the direction of the sound, a trained observer can usually identify the enemy position.
Not risking a shot without special reason. A normal shot is between and 1, yards; yards would be a good medium. Also, a sniper should never fire at less than yards be- cause of the danger of being spotted, unless his position is being threatened. A sniper should carefully weigh the possible consequence of shooting at one of a number of targets, especially when he cannot identify the target in detail.
He may trade his life for an inconsequential target by putting himself in a position of a defensive fire fight. A well-placed shot can disable crew-eerved weapons, radios, vehicles, and other equipment. However, such equipment may be used as bait for more targets coming to assume control of the equipment.
He must ask himself if he observed longer, would the information he gathered far exceed the value of a kill. The well-trained sniper will sensibly evaluate such situations. The ability to accurately determine range is a key skill which must be developed by the sniper. It can spell the difference between a one-shot kill and a miss. For distances up to yards, he determines the number of yard increments between himself and the target.
At ranges beyond yards, the sniper selects a point midway to the target. The yard increment method depends on how much ground is visible to the sniper. If only a small portion of the ground is visible, the yard method is not accurate. The sniper must know the sizes and details of personnel and equipment at known ranges. He can compare these charac- teristics to similar objects at unknown distances and thus estimate objects at unknown distances.
Snipers must be thoroughly familiar with characteristic details of objects as they appear at various ranges such as appearance of men in various positions prone, kneeling, or standing. The sniper establishes a series of mental images which will help him determine ranges on unfamiliar terrain. Successful use of this method depends on visibility.
Under proper conditions, the yard unit of measure or the appearance-of-objects methods are effective ways of deter- mining range. However, proper conditions rarely exist on the battlefield. Terrain with a lot of deadspace limits the accu- racy of the yard increment method, and visibility limits tiie accuracy of the appearance-of-objects method. The sniper will get a more accurate estimate of range if he utilizes a com- bination of several methods to support his answer. If both team members come up with a different estimate of range to a target, an average between the two answers is taken.
This method is used if the sniper assumes the target is no more than "X" meters away, but no less than "Y" meters. When a target appears, its position and range are quickly determined. This method requires the use of either binoculars or tele- scopic sights, equipped with mil scales.
To use the formula, the sniper must know the average height of a man or any given piece of equipment, and he must be able to express the height of the target in YARDS as follows: Field Expedient Range Card. A sniper, looking through his scope sees a man standing. He measures the size of the man, using the mil scale reticle in the scope or the binoculars, and determines that the man is 4 mils high.
He has previously determined that the average enemy is 6 feet tall. To convert that figure to yards, he divides by 3 and finds the average enemy is 2. When entering a conflict, the sniper should determine the average size of enemy soldiers as soon as possible. Once the formula is understood, the sniper need only estimate the actual height of any target in mils and he can determine the range to that target with extreme accuracy.
If estimating range to a half-sized target head to waist inches or 3 feet , cut the formula in half: A man standing appears to be 2 mils high; he is 1, yards away. Careless measure- ment could result in a range estimation error of yards, therefore resulting in a miss. The formula de- pends entirely on the sniper's ability to estimate actual heights of targets in mils.
When the target blends into the background or terrain. Along with know- ing how to adapt his dress for the best concealment, the sniper must also know how to use the ground, proper firing positions, and routes during movement to remain hidden. A sniper must know these target indicators if he is to locate the enemy as well as prevent the enemy from locating him. These indicators are grouped into three general areas— sound, movement, and improper camouflage. The enemy may dismiss small noises as natural, but when someone speaks, he knows for certain someone is near.
Silencing gear should be done before a mission, so that it makes no sound while running or walking. The sniper must move by slow, smooth, deliberate move- ments, being conscious of where he puts his feet and how he pushes aside brush to move through it. The human eye is attracted to movement. A stationary target MOVEMENT may be impossible to locate, a slowly moving target may go undetected, but a quick or jerky movement will be seen quickly.
A sniper must be able to move undetected while under obser- vation of optical equipment. Again, slow, deliverate move- ments are needed. They are divided into three groups: Shine comes from reflective objects exposed and not toned down. The lenses of optical gear will reflect light This can be stopped by putting a paper shade over the end of the optics and by staying in shadows.
Any object that reflects light should be camouflaged. The outline of items such as the body, head, rifle, or other equipment must be broken up. Such outlines can be seen from great distances. There- fore, they must be broken up into features unrecog- nizable, or unnoticeable from the rest of the back- ground. When using a position for concealment, a background should be chosen that will absorb the appearance of the sniper and his gear. Contrast means standing out against the background, such as a man in a dark uniform standing on a hilltop against the sky.
A different color or shape from the background will usually be spotted. Therefore, a sniper must use the coloring of his background and stay in shadows as much as possible. The parts of the face that naturally form shadows should be lightened. The predominate features that shine should be darkened, such as the forehead, cheeks, nose, and chin. The pattern and coloring that should be used is one that wifl blend with Ac natural vegetation and shadows. For jungle or woodland, dark and light green are good.
White and gray should be used for snow areas, and light brown and sand coloring for deserts. The types of facial patterns can vary from irregular stripes across die face to bold splotching. The best pattern, perhaps, is a combination of both stripes and splotches. What one does not want is a wild type design and coloring that stands out from the background.
The ghillie suit is a camouflage uniform or outer smock that is covered with irregular patterns of garnish of blending color. Strips of garnish are folded in half and sewn mainly on the back, legs, alms, and shoulders. Then the strips are frayed or cut longways to give the suit the appearance of vegetation. The suit can also incorporate a close-mesh netting sewn to the back of the neck and shoulders, and then draped over the head to form a veil.
The veil is used while in position to break up the outline of the head, hide the rifle scope, allow move- ment of the hands without fear of detection, and conceal the FMFM B Figure Ghillie Suit, Front View. The veil, when draped over the head, should come down to the stomach or belt and have camouflaged garnish tied in it to break up the outline of the head and the solid features of the net. When the sniper is walking, he pushes the veil back on his head and neck so that he will have nothing ob- structing his vision or hindering his movements. The veil is, however, worn down while crawling into posi- tion or near the enemy.
The ghillie suit does not make one invisible. A sniper must still take advantage of natural camouflage and concealment. Small loops should be sewn to the suit to hold natural vegetation, such as grasses and other vegetation that will not wilt quickly. Ghillie Suit, Back View. The garnish can be replaced by cloth discarded from socks, blankets, canvas sacks, or any other material that is readily available.
The material is then attached to the suit in the same way. What is important is that the texture and outline of the uniform are broken up. The cloth or any other mate- rial can be varied in color by using mud, coffee grounds, char- coal, dye, or paint. Oil and grease should not be used because of their strong smell. Natural foliage helps greatly, when at- tached to the artificial camouflage, to blend in the suit with the background. As the foliage grows old, or the terrain changes, it must be changed on the suit. A normal field cover can be camouflaged with garnish or a garnish substitute when netting is not available to break up the outline of the head.
One has to be careful in camouflaging the rifle to ensure mat the operation of the rifle is not inter- ferred with, that the sight is clear, and that that nothing touches the barrel. Camou- flage netting can be attached to the stock, scope, and sling, then garnish tied in the netting to break up their distinctive out- line. The stock and barrel can be painted for special terrain, such as snow and desert areas.
The M16 can be camouflaged in the same way, ensuring that the rifle remains fully operational. Plain Rifle vs Camouflaged Rifle. The M49 and stand is wrapped or draped with netting and then garnish is tied into it, making sure that the out- line is broken up and that the colors blend in with the terrain. The binoculars are wrapped with netting to break up their distinctive form. Since glass reflects light, a paper hood can be slipped over the objective lens on the scope or the binoculars. M49 and Binoculars, Camouflaged.
The pack can be camouflaged by laying a piece of netting over it, tied at the top and bot- tom. Garnish is then tied into the net to break up the out- line. Natural vegetation should also be used when possible, but not in excess, because of noise, movement, and wilting. In areas with heavy snow or in wooded areas with brush SNOW covered with snow, a full white camouflage suit, possibly with gray shading, is worn.
With snow on the ground and the brush not covered, white trousers and green-brown tops are worn. A hood or veil in snow areas is very effective, and equipment should be striped or totally covered in white.
(U//FOUO) U.S. Marine Corps M40 Sniper Rifle Maintenance Manual | Public Intelligence
In snow regions, visibility during a bright night is nearly as good as in the day, giving snipers full-time capabilities, but move- ment must be undertaken along carefully concealed routes. Firing positions can be made almost totally invisible if selected with care. The sniper must constantly observe the terrain and vegetation changes to pick the most concealed routes of advance and to be certain he is camouflaged properly. He should utilize shad- ows caused by vegetation, terrain features, and cultural fea- tures to remain undetected. He must master the techniques of hiding, blending, and deceiving.
Still, proper coloring of a suit that breaks up the sniper's human outline is needed. A bulky type smock of light material with a hood works well. The hands, face, and all equipment should be blended into a solid pattern after the terrain. The sniper must make full use of the terrain by prop- erly selected and concealed routes of movement. For the most part, movement would be done under the cover of dark- ness with the sniper team hidden or set in position by day- light for protection from elements.
When deployed with regular troops in a built-up area, the sniper should be dressed as the troops are. But when the sniper is in position, he should be camouflaged to match the area he is in. A bulky, shapeless camouflage suit can be used that has been colored to match rubble and debris of the urban area, making sure the outline of the head is broken up by some type of hood.
Movement should be extremely slow and careful, if at all, during daylight hours because of the un- limited amount of possible enemy sniper positions. Move- ment under the cover of darkness is preferable, being set in position by first light. In jungle areas, foliage, artificial camouflage, and camouflage paint are used in a contrasting pattern that will blend with the texture of the terrain. In a very hot and humid area, only a light camouflaged suit can be worn because of the great loss of body fluids caused by wearing a heavy suit.
The vegetation is usually very thick, so more dependence can be made on using the natural foliage for concealment. The technique of hiding may be used if the sniper stumbles upon an enemy patrol and immediate concealment is needed, or if the sniper wishes to "lay low" during daylight hours to await darkness. Sniper Blending With Terrain. Blending is the technique used to the greatest extent in camouflage, since it is not always possible to completely cam- ouflage in such a way as to be indistinguishable from the surrounding area.
A sniper must remember that his camou- flage needs to be so nearly perfect that he can not be recog- nized through optical gear nor with the human eye. He must be able to be looked at directly and not be seen. This takes much practice and experience. In deceiving, the enemy is tricked into a false conclusion regarding the sniper's location, intentions, or movement. By planting objects such as ammunition cans, food cartons, or something to intrigue, the sniper decoys the enemy into the open where he can be brought under fire. Cutting enemy communication wire and waiting for the repair personnel is another technique.
U.S. Marine Corps Scout/Sniper Training Manual
After a unit has left a bivouac area, a sniper can be left behind to watch for enemy scouts that may search the area. Mannequins can be used to lure the enemy sniper into firing, thereby revealing his position. Fatigue and undue haste may override caution and planning. The enemy will have more intensive intelligence as the sniper's activities be- come known. Camouflage, concealment, and cautious move- ment then become of paramount importance.
Attention to every detail and careful planning will enable the sniper to return safely to his unit and be available to execute another mission. One is to plan a primary and an alternate route to and from the objec- tive. This is done by studying, in depth, large-scale maps and aerial photographs of the area, and talking to people who have been through the areas before. He must know as much as possible about an area before moving through it. He must allow enough time for proper camouflage, which should match the type of terrain he will be moving through.
Prior to movement, an inspection should be held for all per- sonnel to ensure that all shiny equipment is toned down, and that all gear is silenced. The sniper must ensure that only mission essential gear is taken along. Open areas and ex- posed ridges should be avoided. He should seek routes with cover and concealment; trails should never be used. Advan- tage should be taken of the more difficult terrain— swamps, dense woods, etc. Areas believed to be under enemy observa- tion, mined, or booby trapped should be avoided. Villages or areas where the snipers are likely to meet natives should be skirted.
Snipers moving in small teams in the proximity of enemy troops cannct afford to be seen at anytime. Therefore, the sniper has to be doubly careful which, in turn, means he has to move considerably slower. He blends into the back- ground, such as grass or brush, before observing. He looks around objects or through brush, not over it, noting every- thing in detail, and using binoculars if needed.
He moves under the most concealed routes by using necessary methods of walking or crawling. Upon reaching the next point, he repeats the process. The type of terrain will dictate the speed of travel. It may mean moving slowly, but if he is spotted, his life and mission are compromised. He is conscious of every step he takes, whether moving with troops or on his own. He walks in a crouch to maintain a low profile with shadows and bushes so as not to be silhou- etted. Most of the enemy will be looking for an upright man.
He very slowly lifts one foot and moves it forward, clearing obstacles, with the toes straight to the front He picks out a point one-half a normal stride to the front, preferably free of dry leaves and twigs, then places the toes or outside edge of the foot down lightly to get the feel of the ground. He routes the foot down onto the ball of the foot. He continues placing the foot until the heel is down with no weight on the foot Now, very slowly, he starts to shift the body weight forward until it all rests on the forward foot but slowly enough mat it makes no sound.
He repeats the process with the opposite foot The ter- rain will determine the speed and silence of move- ment WALK Figure Sniper Moving Upright Walking. It is slow, so speed cannot be essential. To "low crawl," the sniper lays his body as flat on the ground as possible, legs together, feet flat on the ground or pointed to the rear, and arms to the front and flat on the ground. To keep from snagging and moving the vegetation thereby causing detectable overhead movement , nothing, including the rifle, elbows, or feet should extend beyond the edge of his body. Sniper in Low Crawl.
To carry the rifle, the sniper grasps the upper portion of the sling, laying the stock on the back of the hand or wrist with the rifle laying on the INSIDE of the body. The rifle can also be put along the side of the body, under one arm, to be pushed forward as the sniper moves. The rifle should be protected from abuse. The sniper must be sure that the muzzle does not protrude into the air or stick in the dirt. To move forward, the sniper extends his arms to the front and digs his toes into the ground.
Then very slowly, he pulls with his arms and pushes with the feet. He is careful not to raise his head or heels of his feet into the air. It takes a lot of practice to be able to move as slowly and smoothly as necessary, not allowing quick or jerky move- ments. All movement must be very slow and deliberate, with all parts of the body kept as low to the ground as possible especially the head. Rifle Position When Crawling. It is faster for the sniper and less tiring to the body. All parts of the body are kept as low to the ground as possible. Instead of just pushing with the feet, one leg is cocked forward to push with.
When the push- ing leg is tired, the opposite leg can take over, but only one leg is used at a time for a sequence of push- ing. This is to keep the lower portion of the body from raising into the air. The body is kept free of the ground and the weight rests on the arms and legs. The rifle is either carried as in the low crawl or cradled in the arms. Movement is made by alternately pulling with each arm and pushing with one leg, if one still wishes to remain fairly low, or alternating legs for pushing if there is adequate cover.
The sniper should ALWAYS be conscious of not allowing the head and buttocks to raise too high and keeping the legs from making excessive noise when being dragged over brush and debris. To execute a right turn, when extreme care is needed, the body is eased as far to the right as possible, keep- ing the legs together. The left leg is then moved as far to the left as possible and the right leg then closed to it. This will effect a turn to the right and should be repeated until the sniper is facing the required direc- tion.
All this is done very slowly, with the body as low to the ground as possible. Figures 16, 17, and Sequence for Turning While Crawling. The rifle is held in one hand close to the chest and in line with the body. The rifle is not put on the ground. The sling is grasped by the stock to keep it from being tangled on the ground. The weight of the upper body is supported by the opposite arm. Supporting the rifle in the left hand, the sniper picks a point ahead to position the right hand and moves it slowly into position, making no noise.
While moving the right arm, the weight of the upper body can be supported by leaning on the left elbow. Once the right arm is placed, the left arm and rifle is moved forward. A point is then picked to which the knees are moved. Each leg, in turn, is lifted to clear any obstruction and softly placed into its new position.
Again, the situa- tion, ground cover, and terrain will determine the speed and silence of movement. If absolute silence is needed, leaves, twigs, and pebbles can be removed before placing the hands and knees. The movement must be very slow and soft, with breathing being very shallow through the mouth. This can be done by the low crawl in reverse, pushing instead of pulling with the arms. Hands and Knees Crawl. Night movement is essentially the same as in the day, except that it must be slower and more deliberate because of the limited visibility.
One has to rely on the senses of touch and hearing to a greater extent. If at all possible, a sniper should move under the cover of darkness, fog, haze, rain, or high winds to conceal his move- ments. This is a safety factor; but the enemy is harder to spot and specific positions or landmarks are harder to locate. Before moving at night, the sniper lets his eyes adjust to the darkness for at least 30 minutes. To distinguish an object in die dark, he should look 5 to 10 degrees away from the ob- ject, getting low to the ground in order to silhouette the ob- ject against the sky.
If one looks directly at an object in the dark, it will distort, or when the eyes are tired, it will com- pletely disappear. Quick move' ment at night is easily seen, and sound travels farther and clearer. In the darkness, slow and silent movement is essen- tial. While moving, the sniper listens to the night noises for any- thing out of place or unusual, and he continually scans for movement Also, he takes advantage of wind and other noises to mask movements. At night, the senses have to be relied upon to a great extent. He learns to trust them and be able to interpret what they are telling him.
The enemy may even be located by the sense of smell, such as food, vehicles, or garbage. Stalking is the sniper art of moving unseen into a firing posi- STALKING tion within a range that will ensure a first-round kill and then withdrawing undetected. The stalk incorporates all aspects of fieldcraft and can only be effectively learned by repeated practice over various types of ground.
Opportunities to view the ground may be rare in an actual situation; therefore, the sniper must be an expert with the map and aerial photograph so that maximum information can be gleaned from both. Particular attention should be given to nearby features and landmarks that are to be remembered to aid in terrain countdown. An area which appears to present the best possible firing position is selected, though the exact firing position can rarely be pinpointed in advance. The best line of advance is selected and the route is split into bounds; as each bound is reached, the next can be considered in greater detail.
Once a sniper is committed to a line of ad- vance, he may find great difficulty in changing it, so great skill is needed in the initial terrain and route analysis. When possible, these should coincide with the finish and start of the planned bounds. This is important, since it will be this in relation to the distance to be stalked that will dictate the length of time required. It is important that patience is maintained during a withdrawal, since the enemy will be much more alert at this stage than during the approach.
After the shot, the sniper stays motionless, in position, as long as pos- sible. The chances of this happening can be reduced if: The use of a compass, map, and aerial photograph have been mastered route, direction, and distance to various checkpoints planned thoroughly and accurately. A distinct landmark or two, or even a series, have been memorized terrain countdown and a limiting feature. The direction of the wind and sun are noted ; bear in mind that, over a long period of time, the wind direction can change, and die sun will change posi- tion. The sniper has the ability to terrain associate.
Any relaxation on a stalk can lead to carelessness, resulting in an unsuccessful mission, and death. Observation must be undertaken with care and at frequent intervals. It is particularly important at the beginning and end of each bound. If surprised or exposed during a stalk, instinctive immediate reaction is necessary. The sniper must decide whether to freeze and remain immobile or to move quickly to the near- est cover away from the point of exposure and hide.
The sniper must remember that disturbed animals or birds can draw attention to the area of approach. Advantage is taken of any local disturbances or distractions that may enable quicker movement than would otherwise be possible. It should be emphasized that such movement involves a degree of risk, and when the enemy is close, risks should be avoided. The sniper should keep in mind any changes in local cover, since such changes will usually require an alteration to per- sonal camouflage.
The problems are much the same as stalking in daylight, except that a man is less adapted for movement at night. When at all possible, the sniper should stalk at night to be in position by first light. There is a degree of protection offered by the darkness against aimed enemy fire. While observation is still important, much more use is made of hearing, making silence vital. Cover is less important than background, particularly, crests and skylines should be avoided. Maintaining direction is much more difficult to achieve and places greater emphasis on a thorough reconnaissance.
A compass or a knowledge of the stars may be of assistance. The starlight scope is extremely useful when stalking at night, and it can be used as an observation aid when off the weapon. It can be used to pick routes of advance and to select proper firing positions.
See a Problem?
The sniper should be aware of the type of detection device utilized by the enemy and its capa- bilities. Lists with This Book. This book is not yet featured on Listopia. Christopher rated it it was amazing May 04, Bogard rated it really liked it May 03, Alonso rated it it was amazing Jan 24, Mostafa Rahmani rated it it was amazing Feb 24, Robert Law rated it really liked it Sep 26, Kurt rated it it was amazing Oct 10, Jeffry rated it it was amazing Aug 01, Dean rated it it was amazing Aug 26, Lane S rated it it was amazing Jan 11, Jason James rated it really liked it Mar 11, Donald rated it it was amazing Sep 08, John Yarborough rated it really liked it May 22, Bill rated it it was amazing Dec 31, Ashish Mulay rated it it was amazing Feb 12, Survivors rated it liked it Jan 13, Bear rated it liked it Oct 14, Nessy Cocoa rated it really liked it Jun 27, John Ervin rated it it was amazing Aug 21, Adam Fernandez rated it really liked it Sep 27, George Joslyn rated it really liked it Mar 13, Angelo Willems rated it really liked it Dec 23, Azizbek rated it it was amazing Jun 02, Ccollado marked it as to-read Dec 11, Chad marked it as to-read May 08, Luke marked it as to-read Jun 11, Ryan Coons marked it as to-read Aug 15, Daniel added it Jan 23, Nick Wright marked it as to-read May 13, Sheldon marked it as to-read Aug 10, Mark Hofstrand added it Oct 12, Kim marked it as to-read Nov 03, Nicholas added it Dec 27, Gabriel Trueblood marked it as to-read Mar 08, Logan Moore added it Mar 29,